As much fun as I have shopping, I’m always on the hunt for new techniques to try with things I already have. Its kind of like finding money in a coat pocket that you weren’t expecting. So when I stumbled upon new ways to take advantage of the water reactive properties of Tim Holtz Distress Inks, I decided to give it a try.
I fell in love with Distress Inks years ago and over time I’ve collected a few (read all) of them. I’ve used them in any number of ways to dye, tint, edge, stamp or distress my projects, but I’d never thought of combining the ink with water before I put it on the paper. Recently, a technique video or twelve “taught” me how to use my ink collection to watercolor.
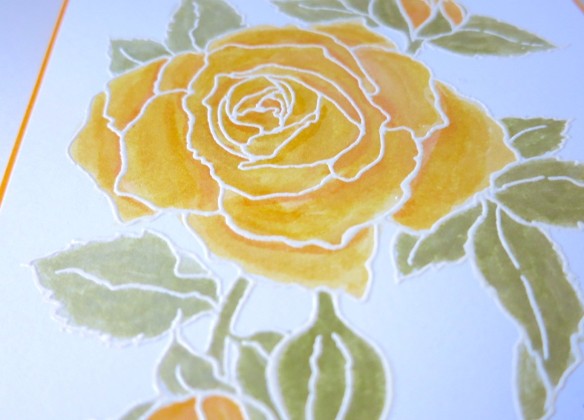
I started with a stamp with a solid outline and plenty of open space: in this case, roses. I stamped my image in a clear ink and used white embossing powder to serve as my outline. Now a white outline on white paper isn’t the easiest to see, but the contrast with the inks makes the finished product fantastic.
Once the embossing powder cooled, I taped my project to my craft sheet with washi tape to reduce movement and paper warping and picked a few colors for my roses. I chose a few shades of yellow and orange and two shades of green. For this technique, I simply turned my inkpad upside down and tapped it on my craft sheet (one spot per color like a mini pallet). I used a VERY small container for my water, since I was using a 110lb cardstock instead of watercolor paper and I wanted to force myself to keep extra water to a minimum.
I wet my brush and then touched it to the colors of ink on my craft sheet working lightest to darkest on the petals and then leaves and set it aside to dry. I should mention before I move on to the rest of the details on this card, that applying the ink directly to the craft sheet makes it much easier to blend colors before adding them to your project, thus reducing the change of wrecking your paper if you’re stubborn like me and won’t use your watercolor paper.
 While my image dried I took out my Prayers stamp set from Hero Arts and die cut the word from gold cardstock. Once dry, I placed my roses in my MISTI stamping tool and arranged my sentiment stamp just above where I intended to place my die cut. You don’t need a MISTI for this project, but I’ve found that I like using the gridlines to make sure my stamps are straight. I also love that if an image doesn’t stamp perfectly, I can re-ink the stamp and close MISTI again, placing the stamp in EXACTLY the same place as the last image. I find this to be an extra precaution I like to take when I’m adding a sentiment to a piece that I’ve already put quite a bit of work into.
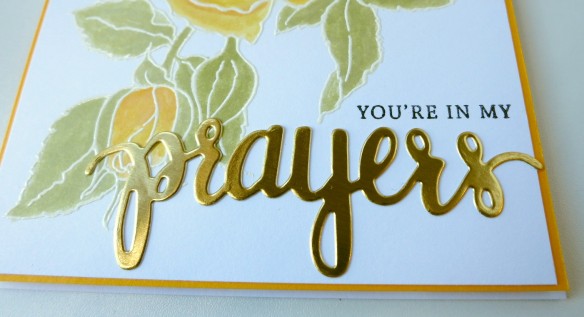
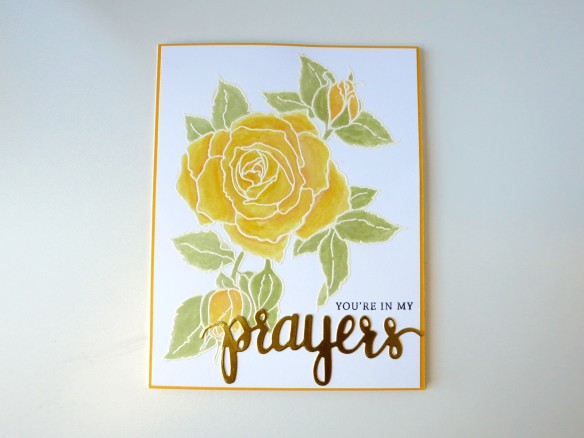
I was about to adhere my die cut when I decided that this card needed a yellow border. I like to cut my border pieces just a quarter inch larger than my focal piece for cards like this for a little added interest. Here’s how it looks assembled…ready to fill an envelope with comfort and thoughtfulness.
If you’re interested in any of the products I used, I’ve listed them here:
- Stampendous Cling Rubber Stamp – Timeless Rose
- Tim Holtz Distress Ink – Wild Honey
- Tim Holtz Distress Ink – Tattered Rose
- Tim Holtz Distress Ink – Mustard Seed
- Tim Holtz Distress Ink – Shabby Shutters
- Tim Holtz Distress Ink – Bundled Sage
- Hero Arts Stamps and Die Set – Prayers
If you think this handmade card is perfect for someone you know, you can find it here.
If you’d like to see any of my other products or you’d like to request a custom order, please send me a message or visit Aluminum Butterfly on Etsy.

Gorgeous card and I love how you explained your technique and process.
LikeLiked by 1 person